Hour of Code - Create Your Own Instagram Filters
Project Link in the Codecraft App ⎋
Lesson Overview
In this lesson we will learn how to make basic image filters using the CSS filter property.
Lesson Summary
DURATION: 45-60 mins
Getting Started: (2-5 mins)
- Introduce the activity
- Direct student to the activity
Activity: (20-40 mins)
Facilitate and support students to complete the tutorial
Wrap-up: (5-10 mins)
Debrief and close
Assessment/Extended Learning: (2-5 mins)
Optional
Audience
This lesson plan is intended for use with learners of any age who are interested in computer science.
Learning Objectives
By participating in this lesson, participants will:
- Learn basic HTML and CSS
- Create image filters to make images stand out
Project Code
Project Link in the Codecraft App ⎋
HTML
What is HTML?
Hyper Text Markup Language, or HTML, is the standard markup language for creating web pages. HTML describes the structure of web pages using markup. Elements are the building blocks of HTML and therefore, web pages. Elements are represented by tags, syntax keywords found within angle brackets (< and >). Tags mark the beginning and the end of elements in HTML. Browsers take these elements and convert them into the visual content that those elements represent.
What is a Web Page?
A Web Page is a text document saved on a computer. When you “visit” a web page, you are connecting to another computer! Visiting a web page is the same as opening a text file on your own hard drive, the only difference between the two is the location of the files and what happens with it when you open it.
Browsers take these elements and tags stored in a Web Page file and convert them into the visual content that those elements and tags represent.
Image HTML tag <img>
Image tags allow the insertions of image on to the HTML document and can be written like so:
<img src="image source" alt="image description" width="width" height="height">
Image tags are unique in that they do not have or even need a closing tag. Like other tags, images have different attributes. The width and height attributes specify the size of the image. The alt attribute provides a description of the image. This is useful for accessibility programs such as screen readers or if the web page does not load properly. The alt description will be shown so that the user will know what the image represents. The src attribute specifies the source of the image and is almost always a link.
<figure> & <figcaption> HTML tag
The <figure> tag is used to show “self-contained” content such as pictures, diagrams and code. Anytime you want to add a photo use <figure> and add a caption to the media with <figcaption>.
<hr> HTML tag
The <hr> tag defines a break or change in topic or content. Use it when you are changing a subject or separating information.
Cascading Style Sheets
What are Cascading Style Sheets?
Cascading style-sheets is a stylesheet language used to describe or determine how the content of a document will be displayed. CSS is a very important part of how our webpages are viewed. They convert plain text into the webpages and websites we visit everyday.
CSS filter property
The filter property is used to define a visual effect to an element, most usually an <img> tag. There are a few functions the filter property can utilize. Some of them are:
blur(px)brightness(%)contrast(%)drop-shadow(h-shadow v-shadow blur spread color)grayscale(%)hue-rotate(deg)invert(%)opacity(%)saturate(%)sepia(%)
The syntax for the filter functions is the name of the manipulation to the image and the value of manipulation. For example if you wanted to set the brightness on an image to half then you would use
img {
    filter: brightness(50%);
}
For more information and examples on the types of filters you can use head on over to the Mozilla Developer Network ⎋, a great resource on what you can create with the web. Once you get an idea of how filters can change your image let’s get started on making our own Instagram-like filters!
https://developer.mozilla.org/en-US/docs/Web/CSS/filter ⎋
You will create a webpage to display different types of filters on different images. You’ll use the elements we learned about above to style your page and display your different filters in a clean way.
Walkthrough
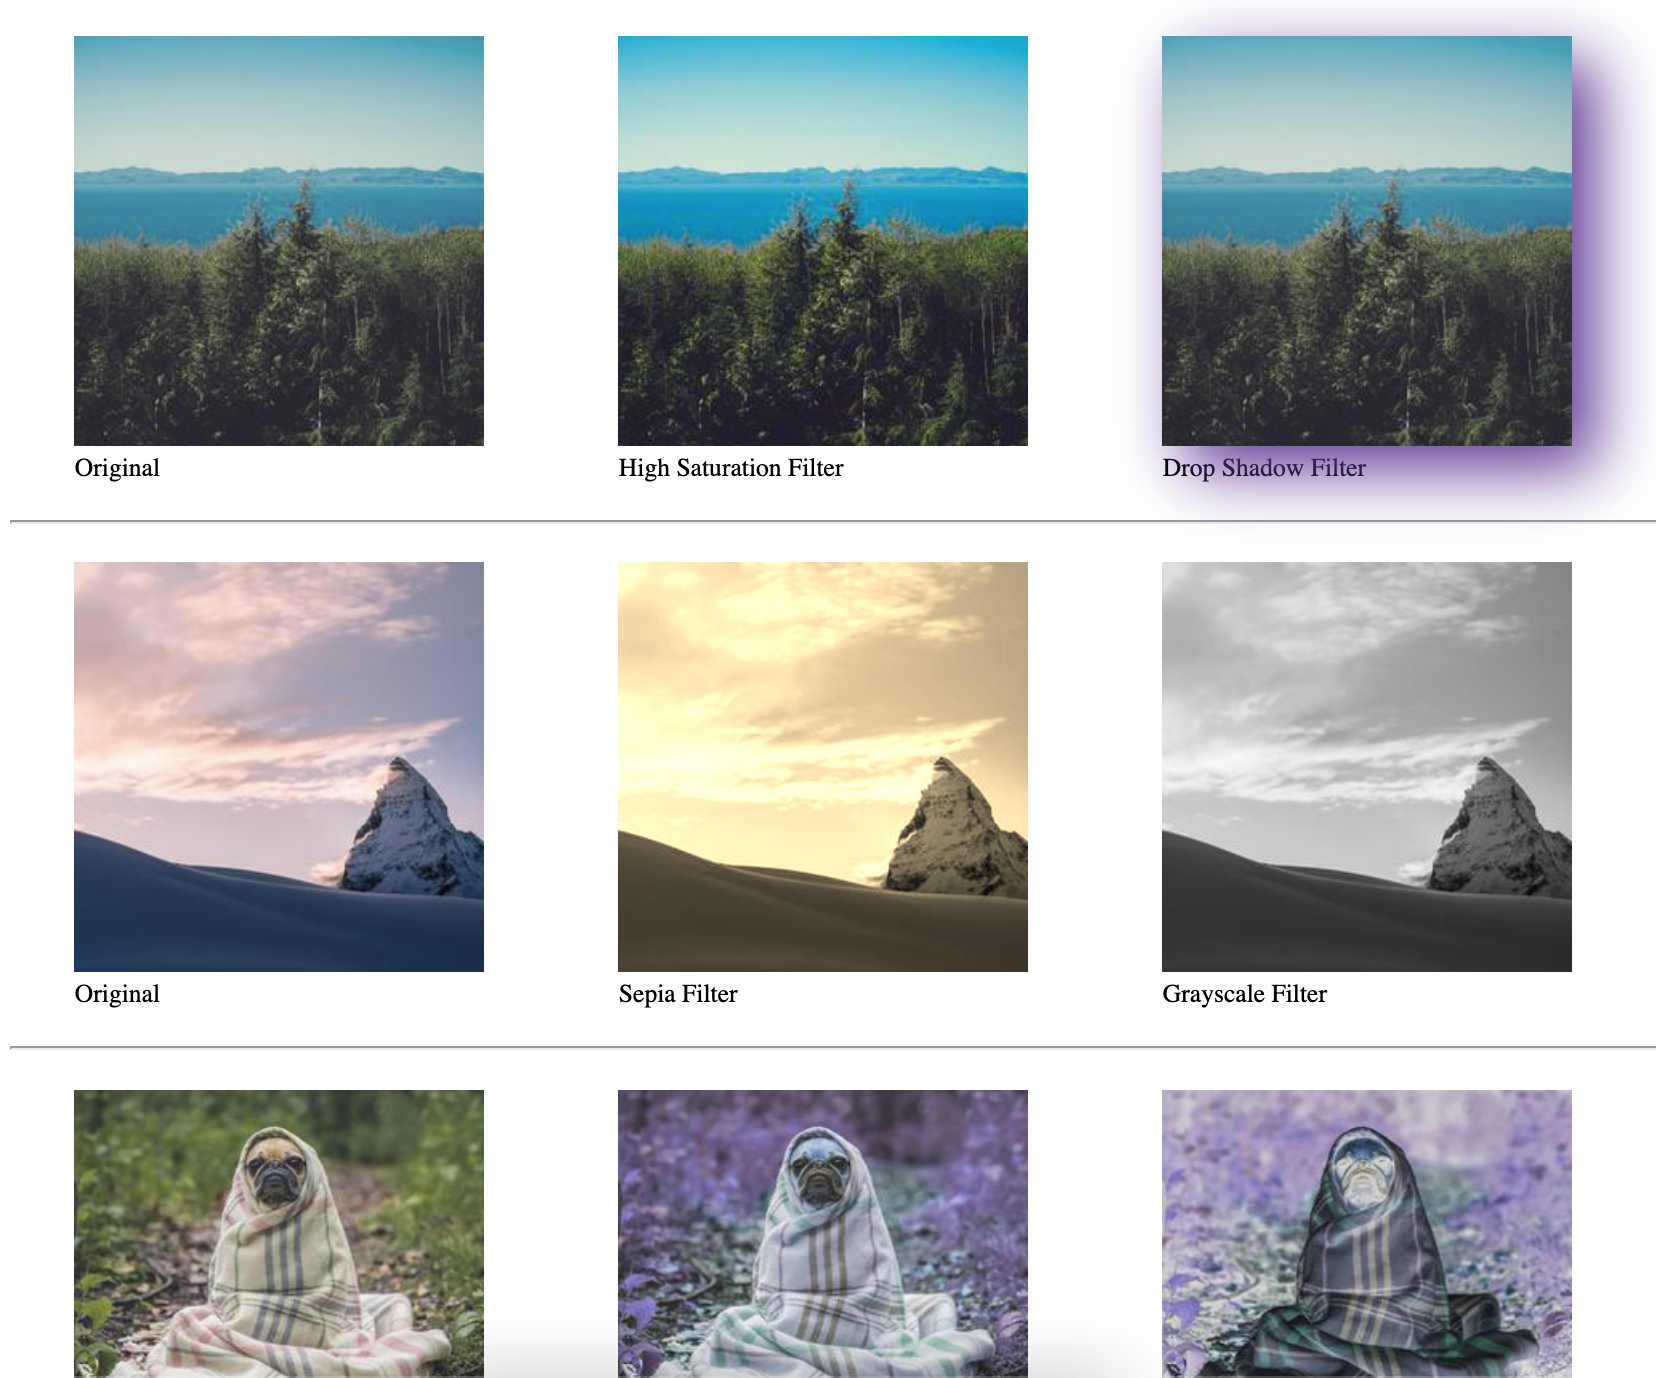
We’re going to start by adding the original image.
<figure>
    <img src="https://picsum.photos/id/10/256" width="256px" height="256px" />
    <figcaption>Original</figcaption>
</figure>
Then we’re going to add some CSS that will be applied to all of the additional images we add. One of the most common uses of inline-block is displaying items horizontally instead of vertically which is the default for most elements.
figure {
    display: inline-block;
}
Next, we’re going to add two additional html elements that we will use to demo high saturation, and drop shadow. Note that we set the class name to the name of the filter we are going to use just to make things easy, we could’ve named the classes anything and the filters would work the same providing we pointed to the element correctly in the CSS.
<figure>
    <img src="https://picsum.photos/id/10/256" width="256px" height="256px" class="high-saturation" />
    <figcaption>High Saturation Filter</figcaption>
</figure>
<figure>
    <img src="https://picsum.photos/id/10/256" width="256px" height="256px" class="drop-shadow" />
    <figcaption>Drop Shadow Filter</figcaption>
</figure>
While it is important to copy all of the code present the only one we’re going to spend time on is the filter property since that’s the one that will be changing between all of these elements.
We added both a contrast and saturate value to this element to help the image pop and simulate the effect that we’re looking for. When adjusting contrast, a value of 0 will make the image completely black, while a value of 100 represents the original image. Values greater than 100 will add contrast to the image.
For saturate, 0 will make the image completely unsaturated, 100 is default, and values greater than 100 will provide super-saturated results.
.high-saturation {
    filter: contrast(110%) saturate(150%);
}
Drop shadow, as the name suggests, adds a shadow to the image. The values we pass to drop-shadow represent h-shadow, v-shadow, blur, and color.
h-shadow and v-shadow represent the pixel values for horizontal and vertical shadows, a negative h-shadow value will place the shadow to the left of the image while a negative v-shadow value will place the shadow above the image.
blur is the third value and is optional. A value of 0 will create a sharp shadow while a higher value will create varying degrees of blur. Negative values are not possible.
color is also an optional value. If not specified, the color is set by the browser but is usually black. color can be set to hex values, RGB, or named colors.
.drop-shadow {
    filter: drop-shadow(15px 15px 20px rebeccapurple);
}
Add the following block of HTML code:
<hr />
<figure>
    <img src="https://picsum.photos/seed/picsum/256" width="256px" height="256px" />
    <figcaption>Original</figcaption>
</figure>
<figure>
    <img src="https://picsum.photos/seed/picsum/256" width="256px" height="256px" class="sepia" />
    <figcaption>Sepia Filter</figcaption>
</figure>
<figure>
    <img src="https://picsum.photos/seed/picsum/256" width="256px" height="256px" class="grayscale" />
    <figcaption>Grayscale Filter</figcaption>
</figure>
The sepia filter accepts values from 0 to 100 with 0 being normal and sepia being 100.
.sepia {
    filter: sepia(80%);
}
Grayscale essentially converts the image to black and white with a value of 0 representing the original image, and a value of 100 representing a complete black and white image.
.grayscale {
    filter: grayscale(100%);
}
Add another row of html:
<hr />
<figure>
<img src="https://picsum.photos/id/1025/256" width="256px" height="256px" />
<figcaption>Original</figcaption>
</figure>
<figure>
<img src="https://picsum.photos/id/1025/256" width="256px" height="256px" class="hue-rotate" />
<figcaption>Hue Rotated Filtered</figcaption>
</figure>
<figure>
<img src="https://picsum.photos/id/1025/512" width="256px" height="256px" class="invert" />
<figcaption>Inverted Filtered</figcaption>
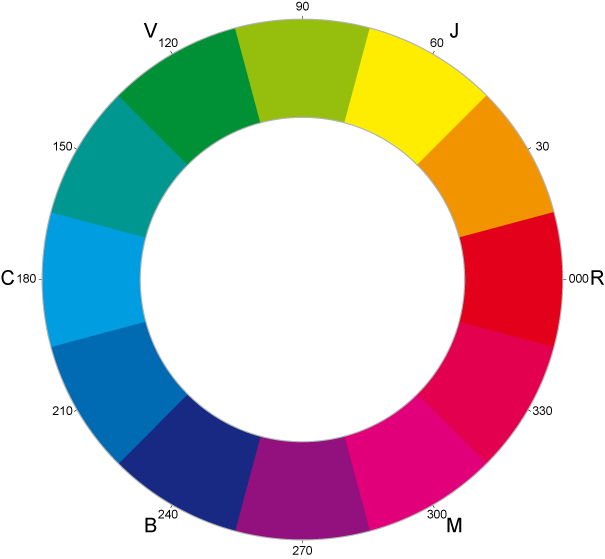
</figure>A hue rotation is where you specify an angle around the color wheel that the input samples will be adjusted by. The input samples being the image. It accepts values from 0 to 360deg and you can get a good idea of how it works by looking at a color wheel, or modifying the values in 30 degree increments.
.hue-rotate {
    filter: hue-rotate(90deg);
}
Invert will invert the samples of the image. A value of 0 represents the original image and a value of 100 represents a completely inverted image. If you’ve ever used the “negative” filter on a camera, that’s what this does.
.invert {
    filter: invert(75%);
}
Lets add one more row of html:
<hr />
<figure>
    <img src="https://picsum.photos/id/1084/512" width="512px" height="512px" />
    <figcaption>Original</figcaption>
</figure>
<figure>
    <img src="https://picsum.photos/id/1084/512" width="512px" height="512px" class="high-saturation-and-drop-shadow"/>
    <figcaption>High Saturation and Drop Shadow</figcaption>
</figure>
and another line of CSS:
.high-saturation-and-drop-shadow {
  filter: contrast(150%) saturate(200%) drop-shadow(25px 25px 25px #FFFFFF);
}
We want to show you that you can use multiple filters together to create some unique effects. Here we created a class that applies both a high contrast and saturation as well as a drop shadow.
We gave quite a few examples on how to use CSS filters. Make it your own by using your own images and your own combination of filters. Have fun!
Contact
Address
2412 Irwin Street
Melbourne, FL 32901
Email: hello@codecraftworks.com
Phone: 321-209-4674, 850-290-4714
Our Company
Copyright ©2024, CODECRAFT WORKS. All Rights Reserved